| Index | Buttons | Fields | Message | Variables |
| Ask/Answer | Colour | Sound | Menus | QuickTime |
Palette Maker Basics
In HyperCard's Power Tools Stack you will find many useful tools. Build your own floating palette using Palette Maker.

The numbers on the steps below correspond to the numbers which appear in the upper left corners of the boxes on the palette card.
First open your Power Tools stack and select Palette Maker from the menu
1. Enter Palette Name:
Type the name of your palette (in this example xtras) in the space provided in box 1.

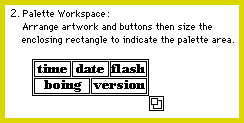
2. Palette Workspace:

Create artwork for your palette using HyperCard's built-in paint tools or paste in bit-map art from elsewhere using the clipboard or scrapbook. Here you draw the 5 boxes as shown and name each one. Once you have finished the boxes create 5 buttons to fit inside them. All buttons end up as transparent in a palette. Here are the scripts for the buttons. The second line of each button's script is used as the message the palette will pass when the button is depressed in the palette. Copy and paste the scripts from the list below

In a palette you are limited to one line scripts, however, if you should need more than a line of script to be executed when a button is depressed; create a handler, put it in the stack or background script and then simply put the handler's name in the second line of the button's script.
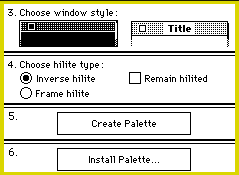
3. Choose Window Style:
Allows you to decide whether the palette will have its name displayed in the drag region or not. Just click on your choice and it will hilite.

4. Choose Hilite type:
Inverse hilite: allows you to specify whether buttons in the palette will be inverted (blackened) when depressed. Framed hilite: allows you to specify whether buttons in the palette will be framed when depressed.
Remain hilited: When not enabled buttons in the palette will be hilited momentarily (like autoHilite), and when enabled they will retain their highlight (like radio buttons).
5. Create Palette:
Create Palette: takes your artwork and buttons and turns them into a palette.

Now you can test your new palette by clicking on each of the buttons
6. Install Palette...:
Install Palette: asks you which stack you would like a copy of this palette installed in.
7. Misc. Palette Instructions:
New Palette Card: creates a new palette card.
Delete Palette: deletes the current palette from this stack or another if you wish.
Show Palette: displays the palette you specify from this or another stack in the center of the card or where you would like.

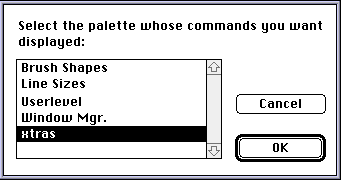
Show Commands: displays a list of all the commands from the palette you specify in this or another stack. You can also highlight the button which corresponds to a particular command. If the palette is from the current card you will be given the option to edit the scripts associated with.


More about the Palette Maker:
The Palette Maker consists of two XCMDs, the "Palette" XCMD which is attached to HyperCard itself and the "NewPalette" XCMD which is attached to this stack. The NewPalette XCMD creates a "PLTE" and a "PICT" resource for each palette.

The PICT is the artwork for the palette and the PLTE is a code description of the palette including the palette's commands. The Palette XCMD is responsible for finding and uniting the "PICT" and "PLTE" resources to display the palette.
Warnings: The Palette XCMD will not display two palettes with the same name at the same time. Several palettes can be open at the same time as long as they have different names.
For best results, do not create palettes with the same name using Palette Maker. The NewPalette XCMD will delete resources with the same names as the ones it is creating.
If you want a colour palette simply replace the black and white PICT resource with a colour one.